Elementor is one of the most popular WordPress website builders. If you’ve created your website using this platform, and want to make your website more accessible, you will need to install an Elementor accessibility plugin. This guide will walk you step by step through installing UserWay as a way to improve the accessibility of your Elementor website.
Step 1: Register Your UserWay Website
The first thing you’ll want to do is register your WordPress website. On userway.org, go to the top right of the home page and select “Start Free Trial.”
Step 2: Get Your Unique Code Snippet
Complete the registration steps until you receive your unique code. You can copy this code onto your clipboard, or save it as a text file. You can also find this code in the welcome email we sent you when you registered.
If you have already registered another website, add this new website to your list and use the same code from that website on this one, too. To access your code, sign in to your UserWay dashboard at userway.org and go to the top menu. From there, look for “My Embed Script,” where you will find the unique code that you will copy.
Step 3: Install the UserWay Widget on Your Elementor Website in the WordPress Dashboard
In the left navigation bar of your WordPress dashboard, select “Elementor,” and then “Custom Code” from the submenu.
On the page that opens from this selection, click the green “Add New Custom Code” button at the center of the page if this is your first time creating a custom code.

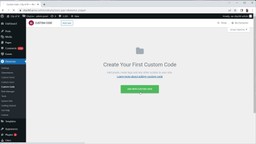
If this is not the first custom code you have created, click the “Add New” button at the top of the page.
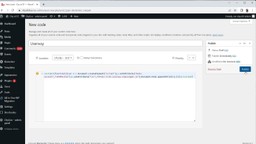
On the next page, add “UserWay” to the title text field so you can easily identify your code in the future. In the dropdown menu, select “body-end” and paste your unique code snippet into the large text field.
Don’t forget to save your changes! On the right side of the page, click “Publish.”
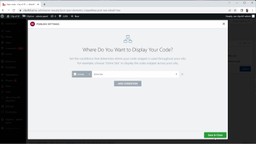
You will see a popup window asking you where you would like to display your code on your website. By default, this code will apply to every page on your website. Ensure that “Entire Site” is selected in the dropdown menu, and then click the green “Save & Close “ button near the bottom right of the page.
Step 4: Preview your website
Next, preview your website to ensure that the UserWay Elementor widget was correctly installed.
You’re all set with your Elementor plugin!