Webflow allows website builders to easily create websites that showcase their products or services. Now, making sure that your visually appealing website is also accessible is easier than ever. UserWay makes Webflow accessibility possible. Here’s how you can install Userway’s accessibility widget to your Webflow website.
Step 1: Register Your Website with UserWay
You will first need to register your website by clicking on the blue “Start Free Trial” button at the top right of the page and completing the registration process.
Once you get to the page with your unique code snippet, you can save it to your clipboard by clicking on the blue copy button or saving the text as a text file. If you forget to copy your unique code, you can also find it in the welcome email you received when you signed up or log into your UserWay dashboard and access it from there. To access it through the UserWay dashboard, login and select “My Embed Script” at the top right of the page. The embed script is your unique code which you can copy.
If you forget your login information
You can find your login credentials in the welcome email that was sent to you upon registration.
If you have already registered a website with UserWay
Add your new website to your list and use the same unique code you used in previous websites. That code is unique to you and can be used on all of your websites.
Step 2: Install the UserWay Widget to Your Webflow Website
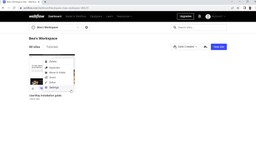
In your Webflow dashboard, go to the list of your websites and find the website where you’d like to install the Webflow widget. Select the icon with three dots at the bottom right of the thumbnail, then click “Settings.”

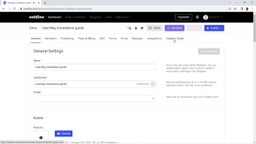
The Settings page will open with navigation tabs across the top. Select the “Custom Code” tab at the end of this list, and scroll to the bottom of the open page.
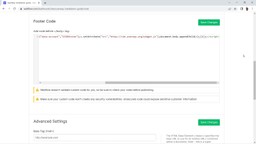
In the “Footer Code” section at the bottom of the web page, paste your unique code snippet, and don’t forget to click on the green “Save Changes” button at the top right.
Once you’ve saved your changes, click the blue “Publish” button at the top right of the page to publish these changes to your Webflow website.
You have now installed your Webflow plugin! Ensure that the accessibility widget is working properly on each page of your website.
Step 3: Customize Your UserWay Widget
To customize your widget options for your Webflow website, you can sign in to UserWay directly from the widget, or on your dashboard at manage.userway.org. All your customization options are available by using either method.
Step 4: Consider your accessibility needs
Depending on your accessibility needs, you may want to consider upgrading to the UserWay PRO-Widget for more extensive accessibility compliance options.