So you want to install the UserWay accessibility widget on your website? Great! But first, you’ll need a unique code. This is your key to setting the widget on any website that belongs to you.
Step 1: Register Your Website
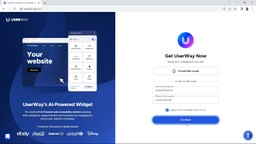
First, you’ll want to register your website at UserWay.org. You can sign up using a Google (email) account, or your business email. You’ll also add the website URL for the site that will have the widget. To get started registering, select “Start Your Free Trial” at the top right of the main UserWay webpage: www.userway.org. Don’t forget to click “Agree” to the terms and conditions.


Step 2: Choose a Plan
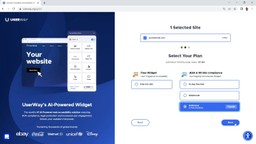
UserWay offers a free, Lite widget, that works based on user-triggered accessibility. We also have our flagship AI-powered widget, a robust Pro widget, starting at $49 per month. The Pro version can deliver even more powerful accessibility improvements.
To select the Pro option in the full widget, enter your payment information and click the green button to “Pay Securely.”
Step 3: Get Your Unique Code
Click next and you will see your unique code. This can be copied and pasted into your website’s back-end code or script. It’s simpler than it sounds.
Your unique code can be copied to your clipboard, or saved as a text file on your computer. It’s just text. We will also include your code in a welcome email you’ll receive when you register.

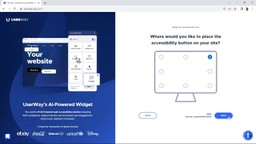
Step 4: Customize Your Button
You can also customize your accessibility button. This is the widget icon that appears on your site’s screen, where users can click and activate accessibility options.
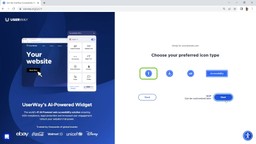
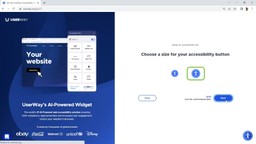
Click the text link here, or on the page: Customize your Widget Now. Here, you can choose your options for size, location, color, and icon type. Or, you’re also fine sticking with the default options.
To customize your button, scroll down the page, select your preferred icon, size, and color, and click “Next”. Next, you can choose where the accessibility button will live on your website. By default, it is set to the top right of the page, but this can be changed.

Step 5: Choose Widget Language
Select a widget language. The widget can automatically detect the user’s language. Site owners can also pre-select a specific language from the language list.

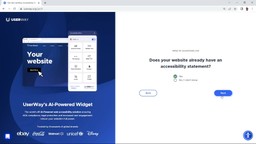
Step 6: Get Accessibility Statement
Does your website have an accessibility statement? If you aren’t sure, don’t worry! Just select the “No / I don’t know” option, and we can always help you out with this later in the “Update your Accessibility Statement” video. If you do have an accessibility statement, click “Yes” and confirm or re-type your website’s accessibility statement URL.
You’re all set!
Using whichever website building platform you prefer, you can now add UserWay’s accessibility widget to your site. If you ever need to revisit your UserWay widget settings or reaccess your code, they are all available on UserWay.org and in the widget. You can also save your welcome email with the code as well.