You can learn more about the different team member permission levels here.
The UserWay Widget is a powerful tool that caters to various teams, including development, QA, marketing, etc. With the capability to manage multiple websites within a single account, it’s crucial to customize access for each user. Therefore, UserWay’s user management operates on a website-specific basis for every additional user in your account.
The following steps will guide you through adding additional users to your account via the widget:


Step 8: Navigate to the Team Management section of the UserWay Dashboard to set the Permissions you would for the new team member. Learn more about the different Permission levels here.
tep 9: Click Permissions next to the name of the newly added team member

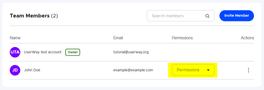
Select the Permissions you would like to set for the new team member. Learn more about the different Permission levels here.
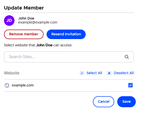
You can limit access for the new team member to specific sites by clicking the 3 dots next to the Permissions dropdown and click Edit
- Select the sites you would like the new team member to be able to access and click Save