

UserWay’s Accessibility Monitor empowers users to create custom scanning scenarios. The Custom Scenario Scan tool enables developers to simulate user journeys through a website, ensuring there are no accessibility issues. Multiple scenarios can be mapped simultaneously, and a detailed report is generated for any detected issues.
Building Custom Scenario Scans
Using custom scenario scans, a developer can create scripts that simulate user interactions with page components. A scenario script can mimic actions such as mouse clicks and keyboard typing, running a scan once all user actions are completed.
Example of a user journey:
- User login
- User navigates to a product page
- User navigates to the shopping cart
The scan will only be performed on the final page (the shopping cart). If you need to scan multiple pages during a particular journey, you will need to create separate scenarios.
A scenario consists of three parts: name, initial page URL, and scenario script. Authoring scenario scripts is similar to programming in a functional programming language. These scripts are written using standard JavaScript, along with a few high-level functions provided by our scenario SDK.
Debugging Guide:
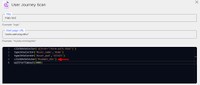
- In this scenario, we intentionally changed the selector in line 4 (to ‘oops..’) to ensure the journey test will fail:
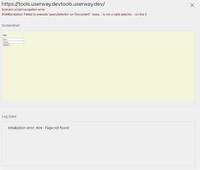
- View the sample test results after the journey/scenario test. After 10 – 15 seconds, a popup with error messages and screenshots should appear:
- Once you close the popup, fix the problem by setting the selector to #submit_btn.
- Save your scenario by clicking on the Save & Close button:
- You can also edit your scenario scripts in the sitemap list. Click the Edit scenario script text link:


If you require additional assistance, feel free to contact us at desk@support.userway.org.