This five-step guide will show you how to install UserWay’s WordPress accessibility plugin and help you kickstart your journey to making your website usable for everyone.
Step 1: Install the UserWay Plugin
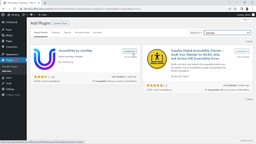
You can install the WordPress Accessibility plugin from the WordPress plugin repository. From your WordPress dashboard, click “Plugins” in the menu on the left side of the page. Then, click “Add New” at the top of the page near the page title. Type “UserWay” into the search bar on the right side of the page. Once you find the plugin, click “Install Now,” followed by “Activate.” Open the left menu to scroll down and click on “UserWay.”

Step 2: Register Your Site With UserWay
If you have already registered with UserWay, you just need to sign in using your email address and password.
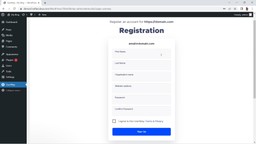
However, if this is your first time installing the UserWay Accessibility widget, you will need to register an account with us. You can use your Google account or type in another email address and then click “Next.” Enter your first and last name, the name of your organization, your website’s address, and your password. You’ll also need to agree to UserWay’s terms and privacy before clicking “Sign up.”
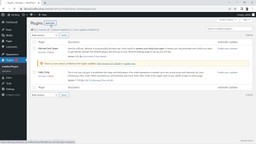
Step 3: Enable the UserWay Accessibility Widget on Your WordPress Website and Customize Your WP Accessibility Plugin
Scroll down to enable the widget. Switch the toggle to on. Now you can customize the size, color, and position of your WordPress accessibility plugin. Don’t forget to click “Save” when you’re done!

Step 4: Generate an Accessibility Statement for Your WordPress Website
Scroll up to the top of the Settings page in WordPress, and you’ll notice that you’re on the “Your Widget” tab in the oval-shaped top menu bar. If you’d like to receive your accessibility statement, click the “Your Widget” tab where you can fill in your details. Then click the “Generate My Accessibility Statement” button, and we will send your statement directly to your email.
While you’re here, look around at the Report & Docs and Videos & Tutorials tabs! You can also always find more information at UserWay.org.
Step 5: Preview Your Site
You’re all set! ou’re taking meaningful steps toward improving your WordPress website’s accessibility. Be sure to preview your website to make sure your widget is installed correctly.
Manually Install UserWay’s WordPress Accessibility Widget on Your Website
You can also install UserWay’s Accessibility Widget to your WordPress website manually by following these easy steps.
Step 1: Register your website with UserWay and get your unique code
If you haven’t done so already, register your website at UserWay.org by clicking the button at the top right of the homepage that says “Start Free Trial” and complete all the registration steps until you receive your unique code snippet.
Copy your unique code snippet as a text file or to your clipboard by clicking the blue button above and to the right of the code that says “Copy.” Alternatively, you can also find this code in the welcome email that we sent you when you registered.
Step 2: Sign in to your UserWay account if you already have one
If you have already registered a website with us, you can use the same unique code you used for your other website(s) that was emailed to you when you registered with us. If you’re having difficulty finding your welcome email and your unique code embed script, here’s how to find it:
Sign in to your UserWay dashboard at UserWay.org and go to the top menu, where you will find the link tag that says “My Embed Script.” There you will find the unique script code that you can copy to your clipboard or save as a text file.
Step 3: Embed your code into WordPress
This step requires some familiarity with code, as you will need to add your unique code to the HTML in your WordPress site. Please be sure not to delete anything from your website’s existing code, as it can negatively impact your website.
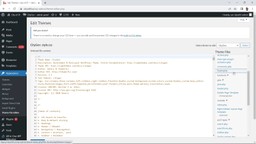
In your WordPress dashboard’s left menu, scroll down to “Appearance” and then select “Theme File Editor.”
On the right side of the page, under “Theme Files,” scroll down and select “footer.php” to open it.
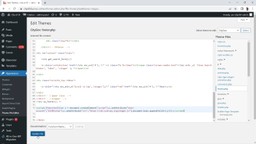
Now, scroll down to find the body closing tag that looks like “</body>” and place your cursor above it, and click “Enter” on your keyboard several times to give yourself some space.
On one of the new blank lines, right-click with your cursor and select “Paste” to insert the script.
Don’t forget to update your website by clicking on “Update File” under the code.
Step 4: Review your website
You’re all set with an accessible WordPress website! Preview your site to test if your new widget is installed and working correctly.